How to Set Up a Raspberry Pi as a Home Web Server
Like most of the world, I’ve been spending a lot of time at home lately. Over the winter I was experimenting with building my own web-based digital tools, like an app to track articles and books I was reading. I initially thought I would need to buy hosting space to have the app accessible, but realized I mostly needed to use it when I was at home anyway, so a URL that only existed on my local network work also work.
I have done a few projects with Raspberry Pis before, most notably a computer vision “record player”, but always found myself looking up the same things like how to set up Wi-Fi and SSH access. I seemed to need to do the same handful of things every time, but they were spread across various documentation and how-tos. This time while setting up the Pi web server I took notes so I would have it all in one place.
To follow along with these steps you will need a second computer to set up the SD card (though you could probably start with a preformatted SD card also), and any kind of Raspberry Pi. I have run web servers on Pi Zeros before, though it can be a challenge to install newer versions of Node.js on ARMv6 based Pis (Zero and the original Raspberry Pi), and sometimes when building a large client app I’ve had to move to a faster Pi from a Pi Zero.
SD Card Setup
1. Install the OS
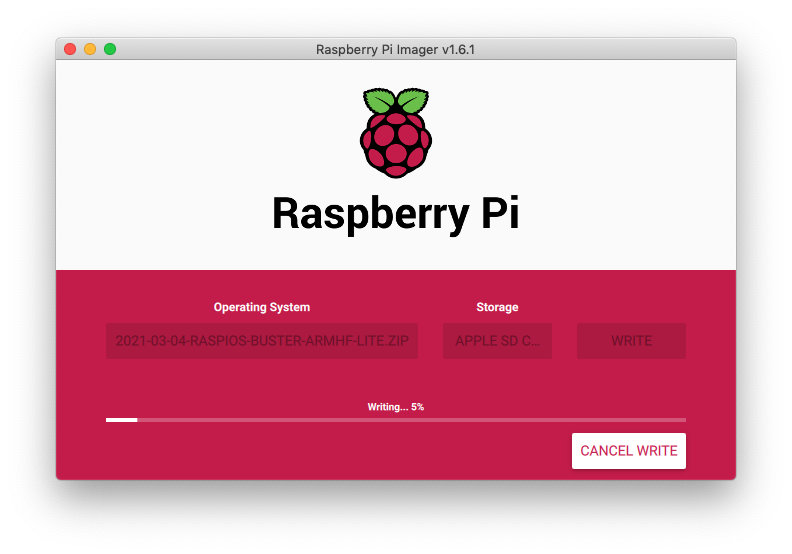
Raspberry Pi recently released their own tool for formatting SD cards, Raspberry Pi Imager. It makes the process a lot easier than it had been previously. The first step is picking an OS to format the card with. Any of the Debian-based OSes should work, though the smallest download is Raspberry Pi OS Lite, which is all you need if you won’t be connecting a display. After that, select the SD card you want to install onto (there will probably only be one choice), and click “Write”.
Step 1 Summary
1. Install the OS: Use Raspberry Pi Imager tool to write the OS to the SD card source
2. Set up Wi-Fi
The RPi Imager tool will likely eject the SD card for you when it’s finished writing, but you want to do two more things before booting up the Pi. You may need to remove the SD card and re-insert it into your computer to see the “Boot” filesystem. First, to enable Wi-Fi you will need to create a file with your network credentials. If you will be plugging the Pi into an ethernet cable you can skip this step.
Create a file called wpa_supplicant.conf in the root directory of the SD card. Open the file in a text editor and paste in the following:
ctrl_interface=DIR=/var/run/wpa_supplicant GROUP=netdev
update_config=1
country=<2 LETTER ISO 3166-1 COUNTRY CODE>

network={
    ssid="<WI-FI SSID>"
    psk="<WI-FI PASSWORD>"
}
Update the country line with your ISO 3166 country code (for the United States this will be US without quotes). Update the ssid and psk lines of the network section to your Wi-Fi network SSID and password, with quotes. Read more about setting up Wi-Fi here.
My wpa_supplicant.conf might look like this:
ctrl_interface=DIR=/var/run/wpa_supplicant GROUP=netdev
update_config=1
country=US

network={
    ssid="patricknet"
    psk="myverysecurepassword"
}
Note on Text Encoding
Setting up a Raspberry Pi headless: “Depending on the OS and editor you are creating this on, the file could have incorrect newlines or the wrong file extension so make sure you use an editor that accounts for this. Linux expects the line feed (LF) newline character.”
Learn More
Step 2 Summary
2. Set up Wi-Fi: Create a
wpa_supplicant.conffile in the root directory of the SD card, and populate it with your Wi-Fi credentials to enable Wi-Fi on boot. source
3. Set up SSH
By default SSH access is disabled on a Raspberry Pi, the usual way of enabling it is either through the GUI or raspi-config, but there is also a simple way to pre-setup on the SD card. Create an empty file called ssh (without a file extension) in the root directory of the SD card, this will enable SSH on boot.
Step 3 Summary
3. Set up SSH: Create an empty
sshfile in the root directory of the SD card to enable SSH access on boot. source
Raspberry Pi Setup
You are now ready to boot the Raspberry Pi, insert the SD card and power up the Pi. After a minute or two of boot time it should automatically connect to your network.
4. Connect via SSH
In a terminal on a second computer and connect to the Raspberry Pi via SSH. The default username and password will be pi and raspberry, and the default hostname will be raspberrypi. If your local network supports the .local TLD you may be able to connect using:
ssh pi@raspberrypi.local
Otherwise you will need to look up the IP address of the Pi in your network admin tools and connect using the IP address:
ssh pi@192.168.XXX.XXX
You can also skip this step and open the Terminal app on the Pi if using a display and keyboard connected to the Pi.
If you have previously connected via SSH to a Raspberry Pi with the default hostname on the computer you are using you may see a message about the remote host identification changing. To successfully connect via SSH you will need to update the known_hosts file to remove the key stored for the other Raspberry Pi.
On Linux or macOS the known_hosts file will be at /Users/[YOUR USERNAME]/.ssh/known_hosts. Find the line in this file that starts with either raspberrypi.local or the Raspberry Pi’s IP address and remove it.
Step 4 Summary
4. Connect via SSH: Connect to the Raspberry Pi via ssh:
ssh pi@raspberrypi.localorssh pi@192.168.XXX.XXX(and enter the default passwordraspberry). You may need to remove a previousraspberrypi.localfrom/Users/USERNAME/.ssh/known_hosts.
5. Change the Password
After connecting to the Raspberry Pi via SSH the login message will suggest that you change the default password:
SSH is enabled and the default password for the 'pi' user has not been changed.>This is a security risk - please login as the 'pi' user and type 'passwd' to set a new password.
Following the instructions you can type passwd which will prompt you first for your current password (raspberry), then for a new password twice.
Step 5 Summary
5. Change the password: Run
passwdto have the system prompt you for a new, more secure password.
6. Change the Hostname
The default hostname of your Raspberry Pi is raspberrypi. You may want to change this for a few reasons. If you have more than one Raspberry Pi on your network this will let you tell them apart, and if your network supports the .local TLD you can use the hostname as the URL to your app.
You will need to update two files to change your hostname. First open /etc/hostname and change the first and only line in the file (currently raspberrypi) to your new hostname. Then, open /etc/hosts and update the the line with raspberrypi to your new hostname. Finally, reboot your Pi for the changes to take effect. Remember, if you SSHed in as pi@raspberrypi.local you will need to use the new hostname instead.
Step 6 Summary
6. Change the Hostname: Open
sudo nano /etc/hostnameand changeraspberrypito your new hostname, thensudo nano /etc/hostsand changeraspberrypito your new hostname. Then reboot,sudo reboot now. source
7. Change the Prompt
I also like the change the default bash prompt whenever I am going to be SSHing into a remote computer so that I can tell the difference at a glance between a local and remote terminal window.
A simple change is just to prepend an emoji to the default prompt, which you can do by adding a line to ~/.bashrc:
echo 'PS1="🥧 ${PS1}"' >> ~/.bashrc
I like the following prompt which adds colors that are different than the ones that I use locally, and a pie emoji:
pi@b: ~
🥧 $
Update your prompt by editing your ~/.bashrc file with sudo nano ~/.bashrc. The bash prompt is set with the PS1 variable, which has two versions in the default Raspberry Pi ~/.bashrc, one for when color_prompt is set to yes, another for otherwise. The default in Raspberry Pi OS is that color_prompt is set to yes, so feel free to overwrite only the first PS1 variable.
The value to set the prompt I showed above is (the sections with [\033 ... and \[$(tput... control turning on and off the colors):
PS1="\n\[\033[48;5;7m\] \d \t \[$(tput sgr0)\]\n\[$(tput bold)\]\[\033[38;5;0m\]\[\033[48;5;14m\] \u@\H: \[$(tput sgr0)\] \[\033[38;5;0m\]\[\033[48;5;15m\] \w \[$(tput sgr0)\]\n 🥧 \\$ "
Run source ~/.bashrc (or . ~/.bashrc) to reload your terminal and see your new prompt.
Step 7 Summary
7. Change the Prompt: Update the
PS1variable in~/.bashrcto make it look different. Add a pie emoji withecho 'PS1="🥧 ${PS1}"' >> ~/.bashrc.
8. Install Git
You will probably want to use Git to manage the source code for your app. It is not installed by default on Raspberry Pi OS so you will need to install it now with apt:
sudo apt install git
Note: You may have to update by running sudo apt-get update in order for Git to install.
You may also want to install another text editor if you want something more customizable than nano.
Step 8 Summary
8. Install Git: Install git to manage your source code with
sudo apt install git.
9. Install Nginx
You can now run a web server (with sudo) on port 80 and have it be available at your IP address or [YOUR_HOSTNAME].local, but that might require more configuration. It will be easier to manage your app if you install a web server/reverse proxy like Nginx. You can install Nginx with apt:
sudo apt install nginx
Once Nginx is installed you should be able to access the default Nginx webpage at your Raspberry Pi’s IP Address or [YOUR_HOSTNAME].local. Make sure to type in the http:// the first time if you are using the .local TLD to avoid triggering search in your browser.
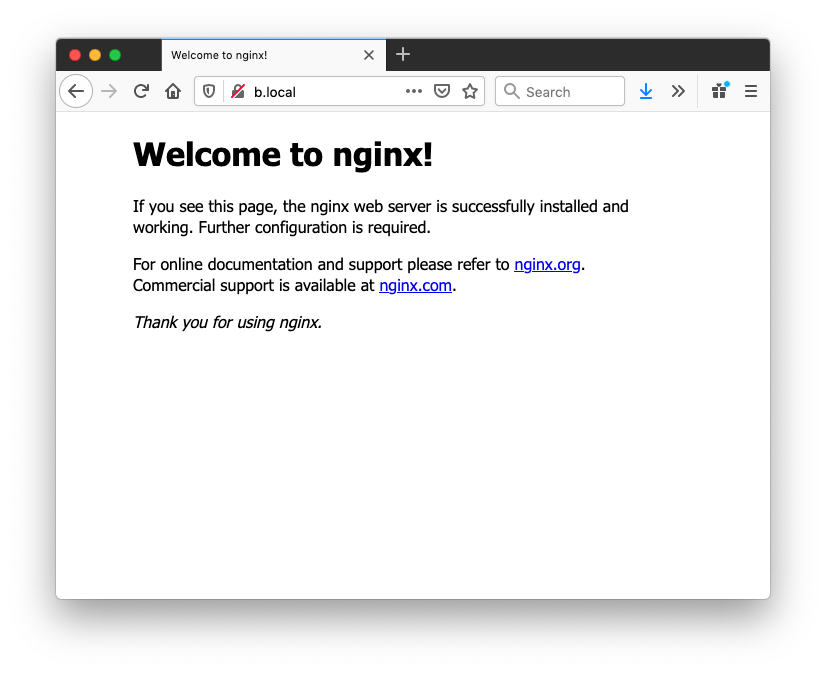
You can now serve any static website from /var/www/html, if you look there you will see an index.html or index.nginx-debian.html file that is generating the current page.
Step 9 Summary
9. Install Nginx: Install with
apt install nginx, then put a static webpage in/var/www/html.
10. Install nvm and npm
I make most of my web apps these days in JavaScript, there are lots of ways to install node and npm, but one easy way to manage versions is with nvm, which can be installed with the script below:
curl -o- https://raw.githubusercontent.com/nvm-sh/nvm/v0.38.0/install.sh | bash
Then reload your terminal with . ~/.bashrc and install the current LTS version of node with nvm install lts.
Note: On an original Raspberry Pi, or a Raspberry Pi Zero, the ARMv6 chip is no longer supported by current versions of node. “Unofficial” ARMv6 builds of node are available at: unofficial-builds.nodejs.org. To install a version using an unofficial build use:
NVM_NODEJS_ORG_MIRROR=https://unofficial-builds.nodejs.org/download/release nvm install lts
Step 10 Summary
10. Install nvm and npm:
curl -o- https://raw.githubusercontent.com/nvm-sh/nvm/v0.38.0/install.sh | bash,. ~/.bashrc,nvm install lts.
11. Set Up Reverse Proxy
In order to access your app on your local network without a port number in the URL it will need to be accessible on port 80, but it will be easier to run your app on another port locally. This can be done with an Nginx reverse proxy.
Nginx configuration is done via server block files, you can delete the default enabled server block by running:
sudo rm /etc/nginx/sites-enabled/default
Next, make your own empty server block in the sites-available directory: . The [YOUR SITE] part of the path can be anything, but it makes sense to give it the name of your app.
sudo touch /etc/nginx/sites-available/[YOUR SITE].conf
You can now edit your server block file:
sudo nano /etc/nginx/sites-available/[YOUR SITE].conf
The server block below will proxy processes running on port 8080 to port 80 (but you can substitute any port on the proxy_pass line). Make sure to replace the [HOSTNAME] sections with your Raspberry Pi’s hostname (or omit this line if accessing via IP Address):
server {
    listen 80;
    server_name www.[HOSTNAME].local [HOSTNAME].local;

    location / {
       proxy_pass http://127.0.0.1:8080;
    }
}
Then, link your Nginx config file to the sites-enabled directory:
sudo ln -s /etc/nginx/sites-available/[YOUR-SITE].conf /etc/nginx/sites-enabled/[YOUR-SITE].conf
Test your Nginx config with sudo nginx -t. You should see a success confirmation message:
To enable the configuration reload the Nginx config:
sudo systemctl reload nginx
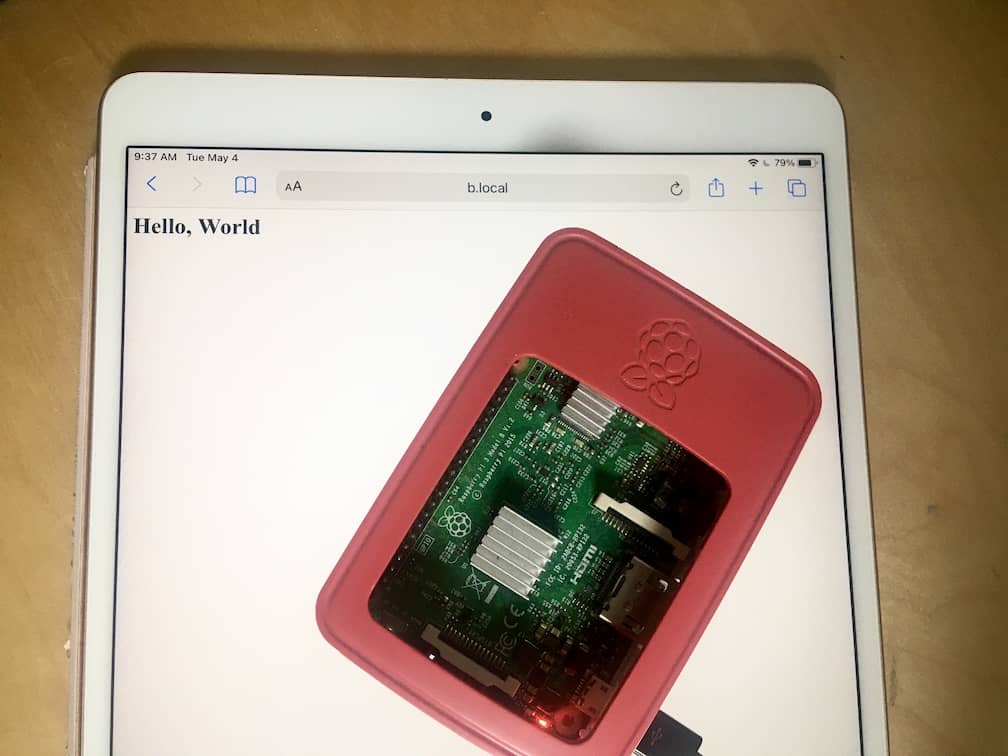
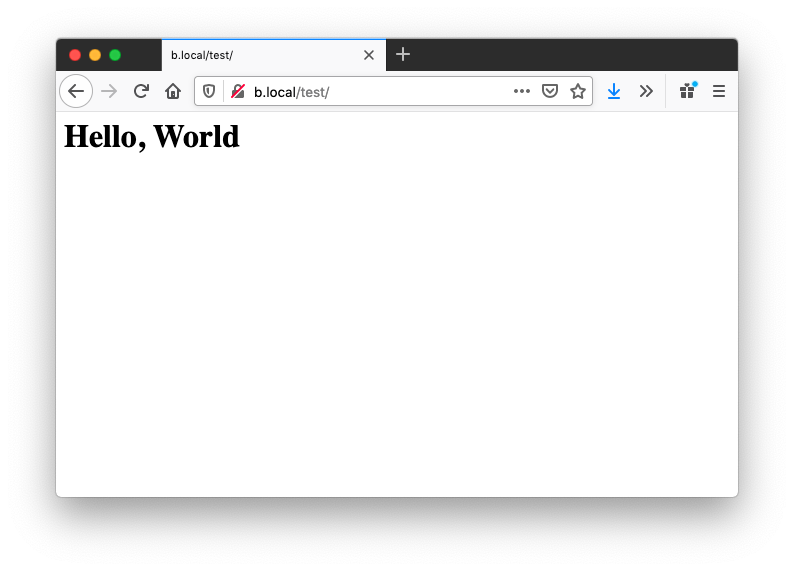
The last step is cloning your project to the Raspberry Pi and running it on port 8080, your app should now be available at [HOSTNAME].local!
Step 11 Summary
11. Set Up Reverse Proxy: Remove default:
sudo rm /etc/nginx/sites-enabled/default, Create config file:sudo touch /etc/nginx/sites-available/[YOUR SITE].conf, Edit config file (see above):sudo nano /etc/nginx/sites-available/[YOUR SITE].conf, Link to sites-enabled:sudo ln -s /etc/nginx/sites-available/[YOUR-SITE].conf /etc/nginx/sites-enabled/[YOUR-SITE].conf, Reload Nginx:sudo systemctl reload nginx. source
All Steps:
- Install the OS: Use Raspberry Pi Imager tool to write the OS to the SD card source
- Set up Wi-Fi: Create a
wpa_supplicant.conffile in the root directory of the SD card, and populate it with your Wi-Fi credentials to enable Wi-Fi on boot. source - Set up SSH: Create an empty
sshfile in the root directory of the SD card to enable SSH access on boot. source - Connect via SSH: Connect to the Raspberry Pi via ssh:
ssh pi@raspberrypi.localorssh pi@192.168.XXX.XXX(and enter the default passwordraspberry). You may need to remove a previousraspberrypi.localfrom/Users/USERNAME/.ssh/known_hosts. - Change the password: Run
passwdto have the system prompt you for a new, more secure password. - Change the Hostname: Open
sudo nano /etc/hostnameand changeraspberrypito your new hostname, thensudo nano /etc/hostsand changeraspberrypito your new hostname. Then reboot,sudo reboot now. source - Change the Prompt: Update the
PS1variable in~/.bashrcto make it look different. Add a pie emoji withecho 'PS1="🥧 ${PS1}"' >> ~/.bashrc. - Install Git: Install git to manage your source code with
sudo apt install git. - Install Nginx: Install with
apt install nginx, then put a static webpage in/var/www/html. - Install nvm and npm:
curl -o- https://raw.githubusercontent.com/nvm-sh/nvm/v0.38.0/install.sh | bash,. ~/.bashrc,nvm install lts. - Set Up Reverse Proxy: Remove default:
sudo rm /etc/nginx/sites-enabled/default, Create config file:sudo touch /etc/nginx/sites-available/[YOUR SITE].conf, Edit config file (see above):sudo nano /etc/nginx/sites-available/[YOUR SITE].conf, Link to sites-enabled:sudo ln -s /etc/nginx/sites-available/[YOUR-SITE].conf /etc/nginx/sites-enabled/[YOUR-SITE].conf, Reload Nginx:sudo systemctl reload nginx. source